Hi everyone. Today I will show you how you can use BranchCache in Hosted Cache Mode to reduce your WAN traffic and to improve your users experience.
You need the following things:
- Hosted Cache Server: Windows Server 2012 Standard (Windows Server 2008R2 Enterprise will work too but an Enterprise license is much more expensive)
- Content Server: Windows Server 2008R2 Standard
- Clients: Windows 7 Enterprise or higher or Windows 8 Enterprise or higher
- WAN Emulator: WANem (more information about WANem here)
Test Setup
The below picture shows how I set up my test machines:
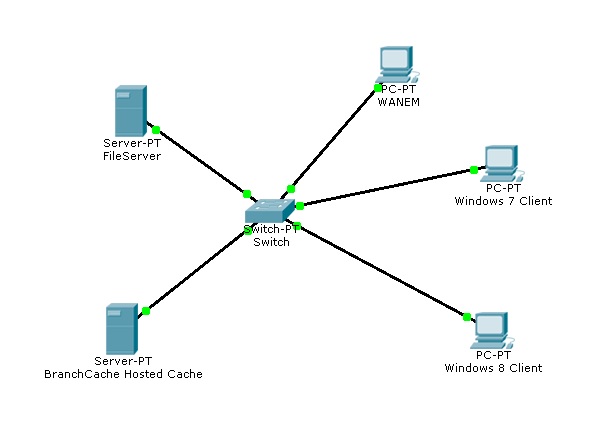
Additionally I configured Static Routes for my FileServer and my Client machines. The Static Route of the FileServer forces it to send traffic always over the WANEM machine to the Client machines. The Static Route for the Client machines forces them to send traffic always over the WANEM machine to the FileServer.
This way you can emulate how file downloads will behave over WAN links.

This is what you need to do to make it work:
On the FileServer:
- Run cmd as Administrator and run the following command:
route –p add <Client Machine IP> mask 255.255.255.255 <WANEM IP>
Important: You need to add a Static Route for every Client machine.
On the Client Machines (on all clients):
- Run cmd as Administrator and run the following command:
route –p add <FileServer IP> mask 255.255.255.255 <WANEM IP>
On the WANEM machine:
- All you need to do here is to make sure that packets will be forwarded.
Hosted Cache Server Setup
To setup your Hosted Cache Server you need to do the following:
Run PowerShell as Administrator and enter the following commands:
Install-WindowsFeature BranchCache -IncludeManagementTools
Enable-BCHostedServer -RegisterSCP
That´s all you need to do to make BranchCache work for your Windows 8 Clients.
For Windows 7 Clients there are some additional steps:
If you run cmd as Administrator and run the following command:
netsh branchcache show status all

You will receive a warning that you need a certificate to make BranchCache work for Windows 7 Clients. You can create a certificate for your Hosted Cache Server by following this instructions:
The first step is to install IIS on your Hosted Cache Server and click on Server Certificates.

Now click on Create Self-Signed Certificate…

Choose a friendly name like “BranchCache” and click on OK.

Run mmc as Administrator and add the Snapin Certificates. Choose Computer account and click Next.

Now choose Local computer and click on Finish.

Now open the Export Wizard.

Choose No, do not export the private key.

Next choose DER encoded binary X.509 (.CER).

Now double click your certificate and go to Details. Copy the Thumbprint value and remove all whitespaces.

Now run cmd as Administrator and run the following command:
netsh http add sslcert ipport=0.0.0.0:443 certhash=<Thumbprint value> APPID={d673f5ee-a714-454d-8de2-492e4c1bd8f8}

If your run cmd as Administrator again and run the following command again, you will no longer receive the warning mentioned above:
netsh branchcache show status all
That´s it. You have successfully configured your Hosted Cache Server for Windows 7 and Windows 8 Clients.
Content Server Setup
The first thing you need to do is to install the feature BranchCache for network files on your FileServer.

The next step is to create a GPO for your FileServer:
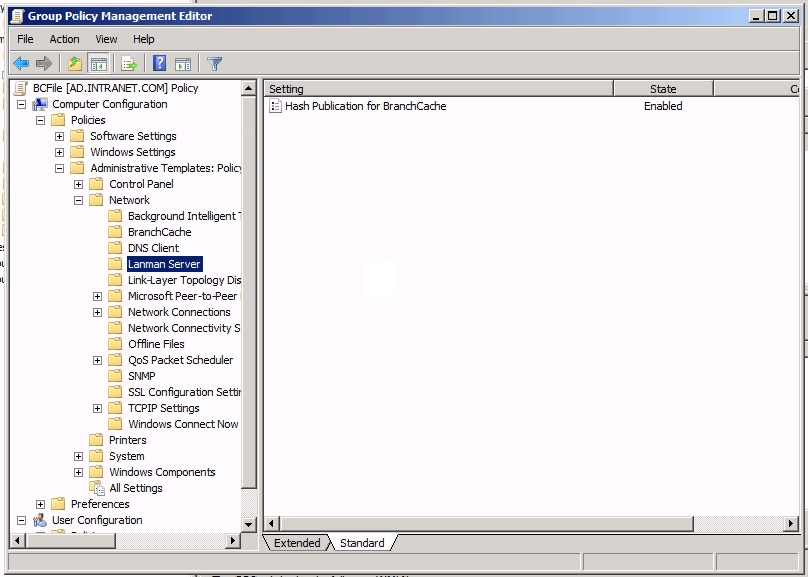
All you need to do is choose Allow hash publication for all shared folder.

The last step is to enable BranchCache on your Share:
Access your Shares Properties and go to Advanced. Now check Enable BranchCache and click on OK. Done.

That´s all you need to do to enable BranchCache on your FileServer.
Windows 8 Client Setup
To setup your Windows 8 Clients to use BranchCache you need to do the following:
Run PowerShell as Administrator and enter the following command:
Enable-BCHostedClient -ServerNames <Hosted Cache Server Name>
That´s it. Your Client is now ready.
Windows 7 Client Setup
To configure your Windows 7 Clients create a new GPO and enable the following BranchCache settings:
- Turn on BranchCache
- Set BranchCache Hosted Cache mode

Now enter the FQDN of your Hosted Cache Server.

The next step is to configure your Clients Windows Firewall. Enable the following Inbound Rules:
- BranchCache Content Retrieval (HTTP-In)
- BranchCache Peer Discovery (WSD-In)

Now import the Hosted Cache Servers certificate which you exported earlier.


Import your certificate to Trusted Root Certification Authorities.

Additional step:
You can set a network latency value. If your network latency exceeds this value your client will get the data from your Hosted Cache Server instead of the Content Server. If you set a value of 0ms your Hosted Cache Server will be contacted always. (The default network latency value is 80ms).
Important: Please keep in mind that your clients will also get their data directly from your Content Servers if your files are smaller than 64KB.

That´s it your client is now ready.
WANEM Setup
Access your WANEM machine via http://<WANEM IP>/WANem and setup a bandwidth limit and delay for your test.

Well, that´s it. You successfully configured BranchCache in Hosted Cache mode. Pretty simple, isn´t it?
I hope my post was interesting and useful for you.
You can read more about BranchCache in this document you can get from here.
Sources:
http://technet.microsoft.com/en-us/library/ff710475(v=ws.10).aspx
http://technet.microsoft.com/en-us/library/dd637793(v=ws.10).aspx
http://pertorben.wordpress.com/2013/04/19/branchcache-demonstration-part-1/
http://richfrombechtle.wordpress.com/2012/07/05/windows-server-2012-licensing-changes/
http://vninja.net/virtualization/installing-and-configuring-wanem-virtual-appliance/
http://www.itsyourip.com/networking/howto-add-persistent-static-routes-in-windows/comment-page-1/

Great write up!